

To maintain the same general scale and aesthetic cyclekart chassis are constructed to set dimensions. Deviations from these dimensions are possible if your tribute car differs in proportions but to follow the recommended wheelbase and track these dimensions are more or less optimized in the 'Stevenson' Design.
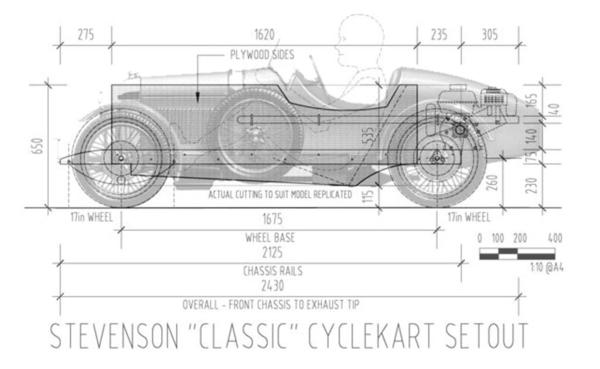
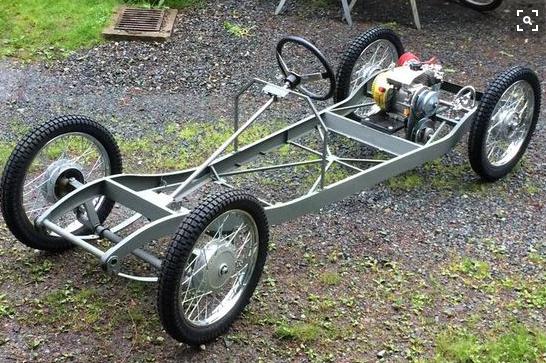
The 'Stevenson' design was penned by Michael and Peter Stevenson the originators of the cyclekart and provides a design formula allow for easy adaptation to any tribute car. This design provides a good starting point for any chassis design by overlaying a silhouette of your chosen car over the top of the basic layout above as can be seen in the following image of an Amilcar.
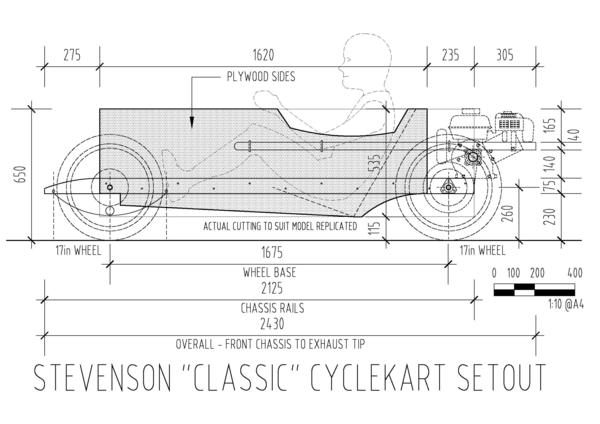
The following drawings are from the Stevensons website - https://cyclekarts.com/CycleKartSpecs.html and give an overview of the dimensions of the original cyclekart. The drawings are offered more as a set of study-plans than building instructions. They're not specific blueprints to insert tab A into slot B, etc. They're notes of how some of the parts on the Type 59 are done, and a general outline of the body size.
The drawings show the taper on the chassis rails and give an overview of the body and front axle construction.
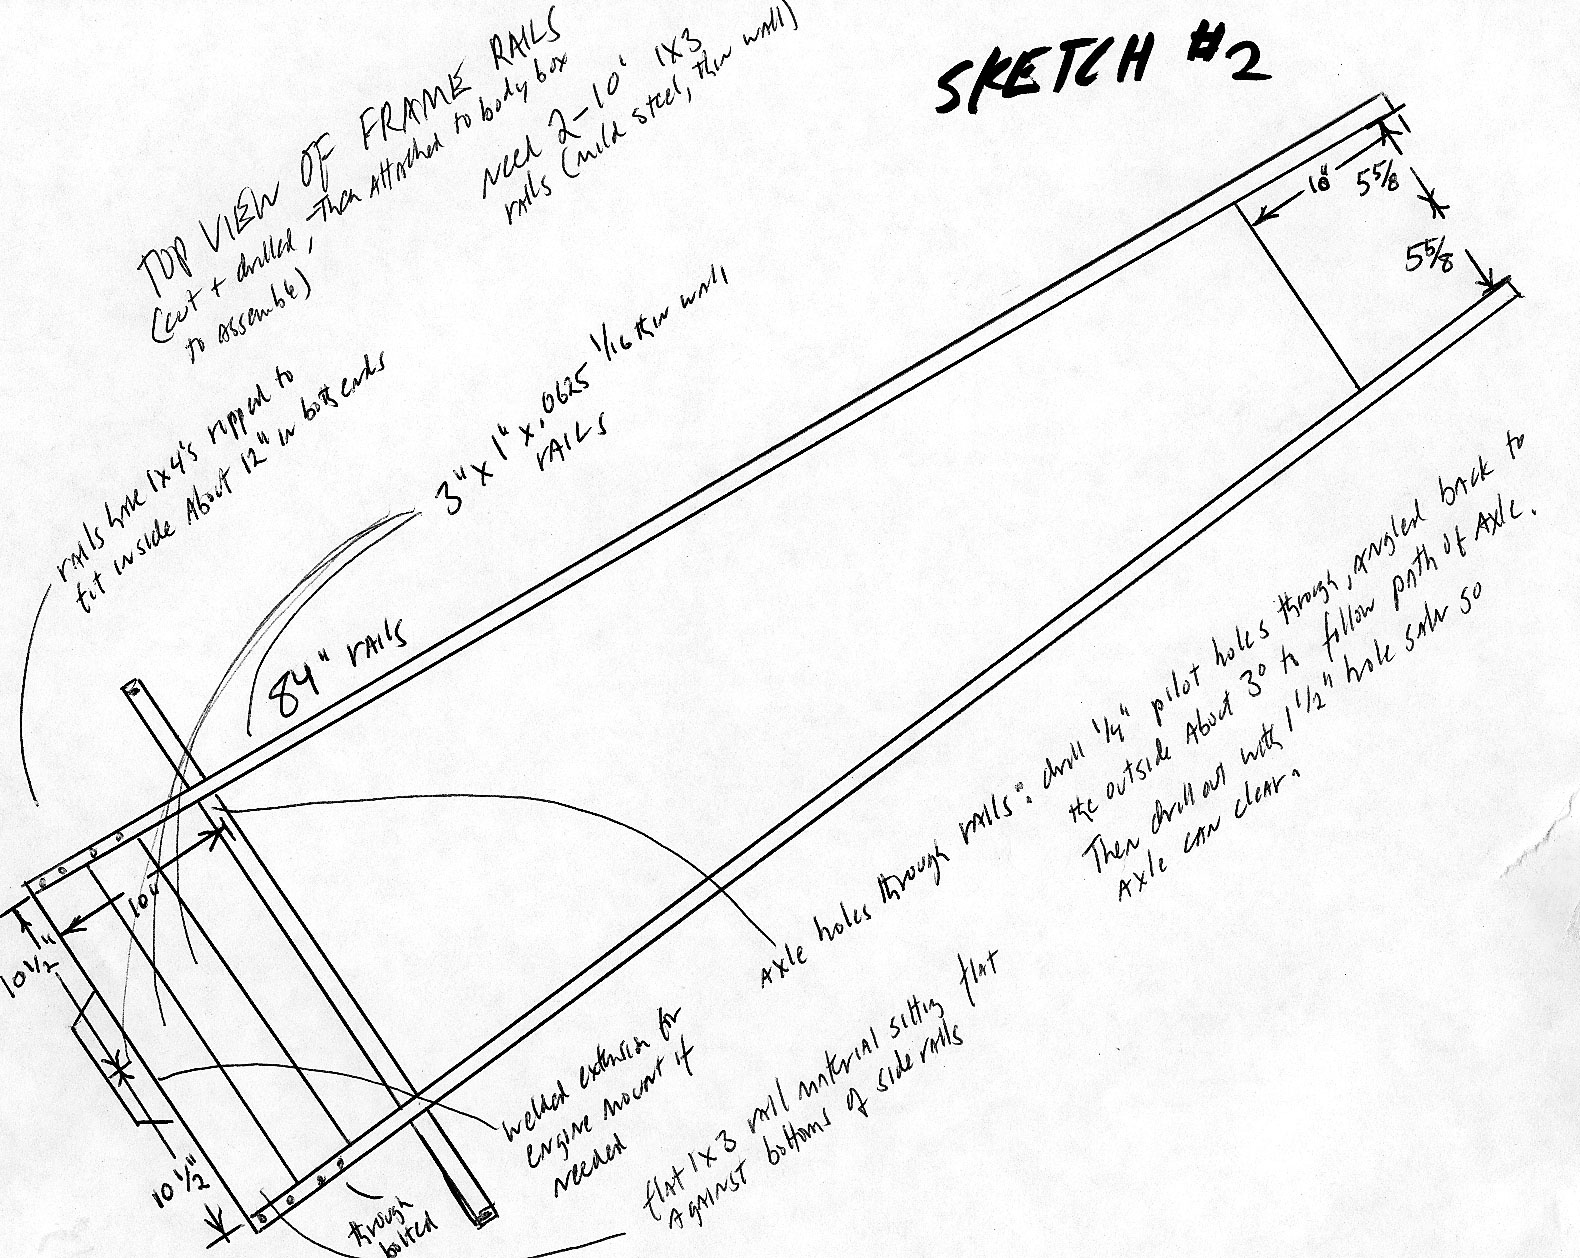
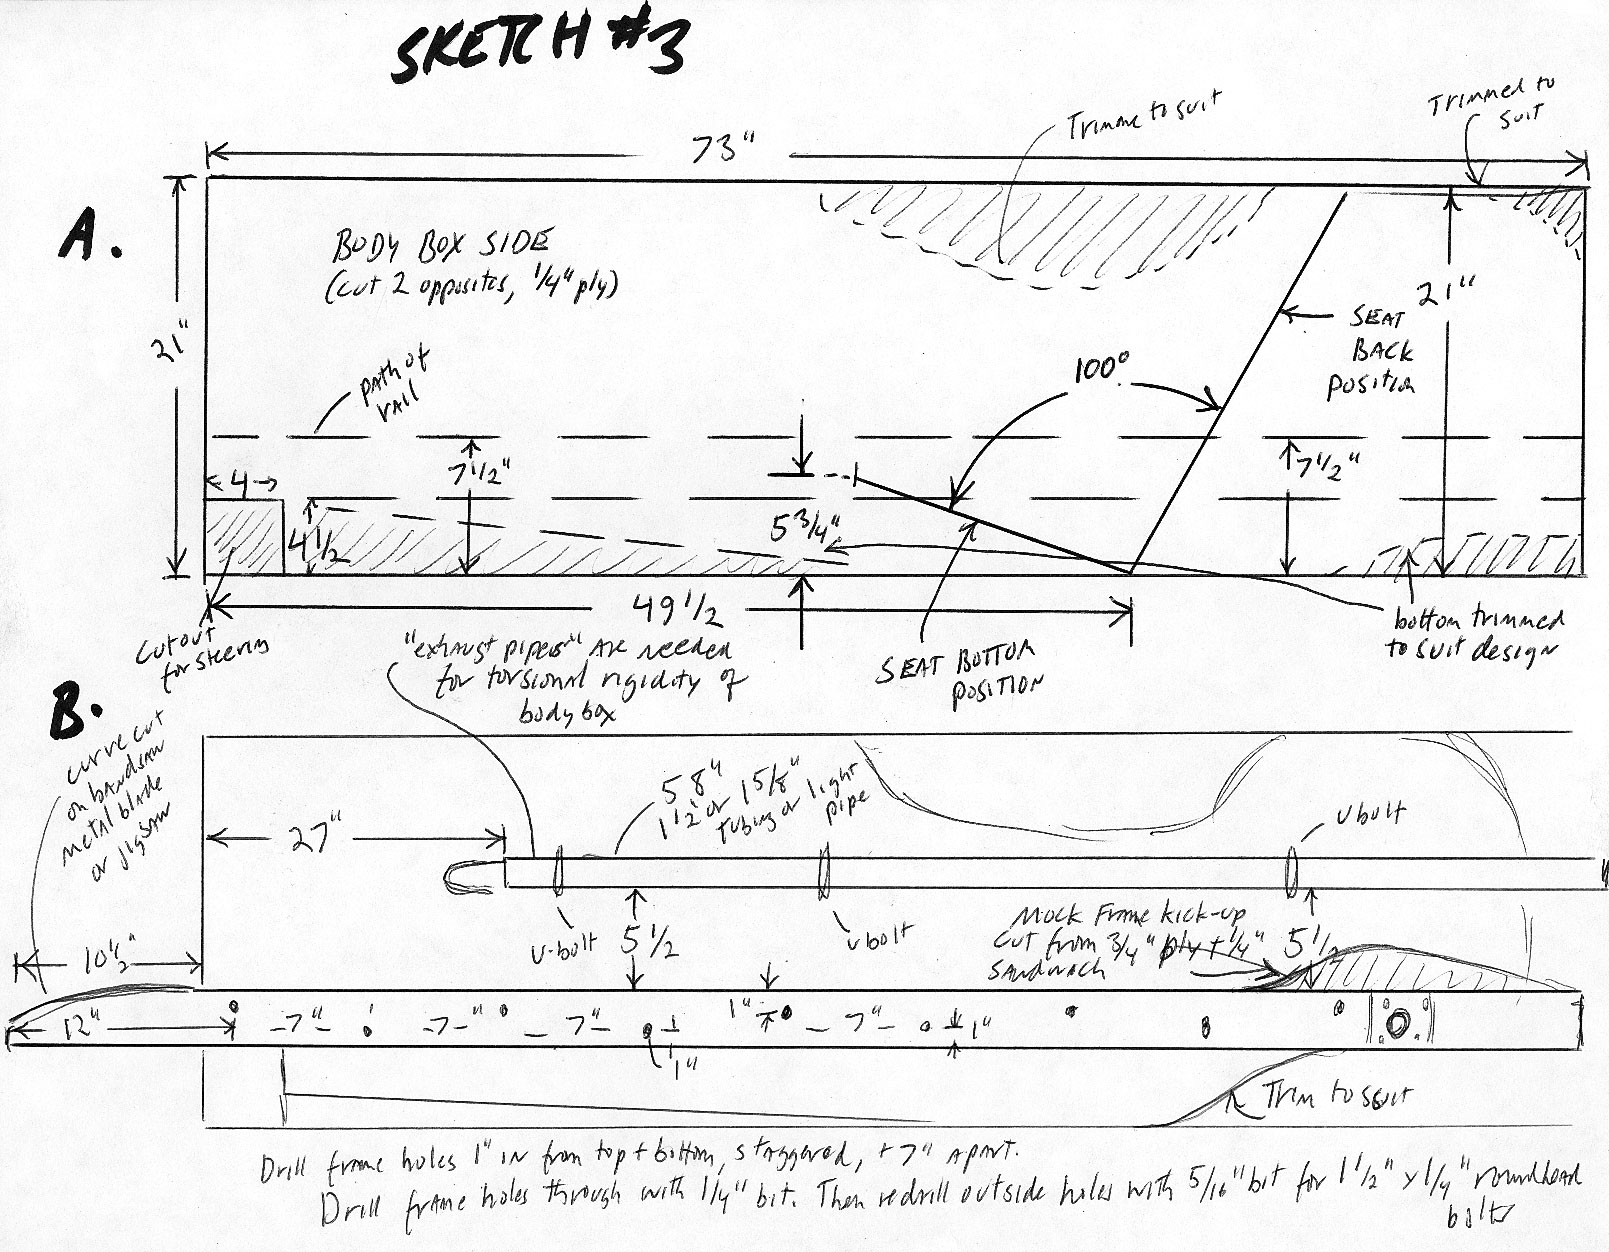
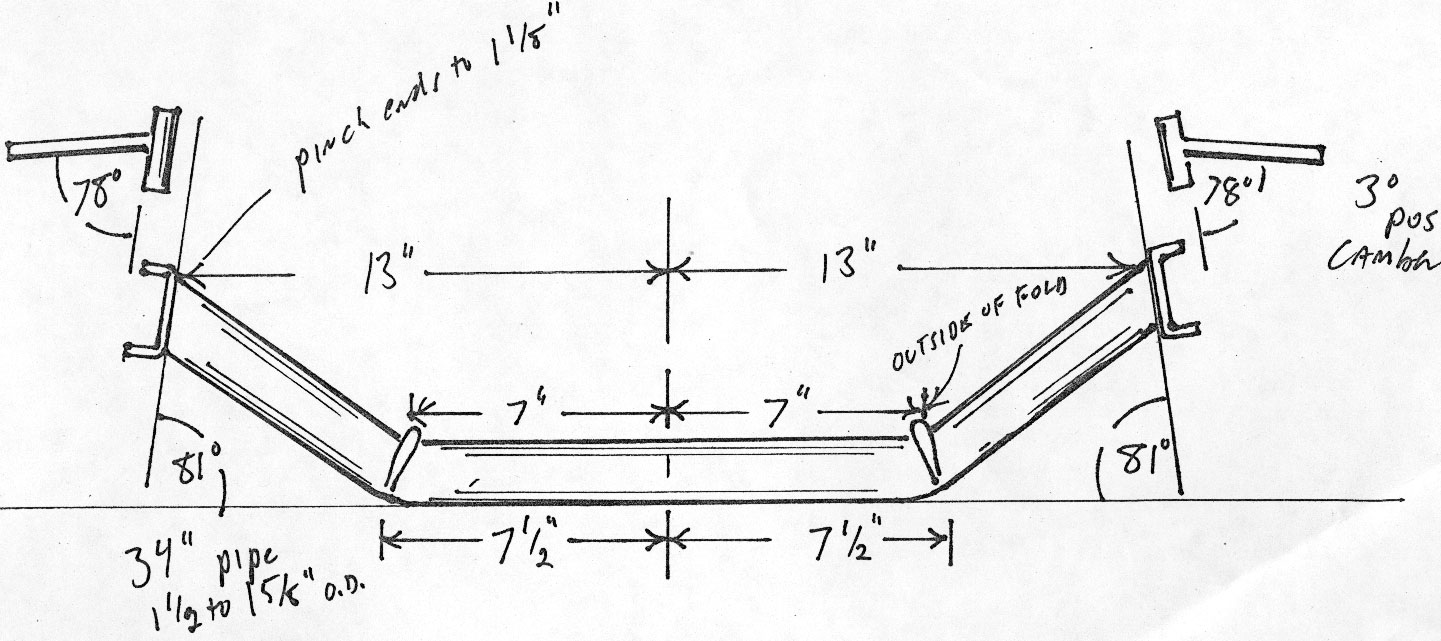
credit cyclekarts.com
Construction and materials
Cyclekart chassis construction is typically made from welded rectangular hollow section steel (most commonly referred to as RHS) or sometimes parallel flange channel (referred to as PFC). RHS can be readily sourced via your local steel supplier as it is a standard size, but the required 25 x 75mm cross sectional dimensions are a non standard size for PFC. Many advanced chassis builders make their own C section chassis rails by welding together profile cut flat steel sections. This type of construction allows more elaborate chassis designs to be made but is a lot more complex for the novice.
Typically a 75 x 25 x 1.6mm RHS profile is used with each frame rail being 2430mm long 1.9mm thickness would be better but is not a common size in Australia.
Basic chassis design follows three basic styles, straight chassis rails, drop chassis rails and profiled chassis rails.
The Stevenson design is the original and most simplest design and is based on a straight rail chassis. Dimensions for this design are given in the image above.
Straight Chassis Rail Design
(Difficulty 1/5)

Straight chassis
The most basic chassis design consists of two straight chassis rails with cross members and is the easiest style to build. The distance between the side rails tapers inwards towards the front of the vehicle. The side rails are also often profiled so that the very front end of the rail slopes downwards. This is achieved by making a 'pie cut' to the side of the rail to allow the top of the rail to taper downwards. This is strictly an aesthetic change.
In this design the rear axle most often passes directly through the chassis rail and the front axle is profiled to ensure that the centre of the front wheels are in line or slightly above the chassis to ensure that the chassis sits correctly.
Cross member location is determined by the tribute car design but most often comprises of three members spaced as above.
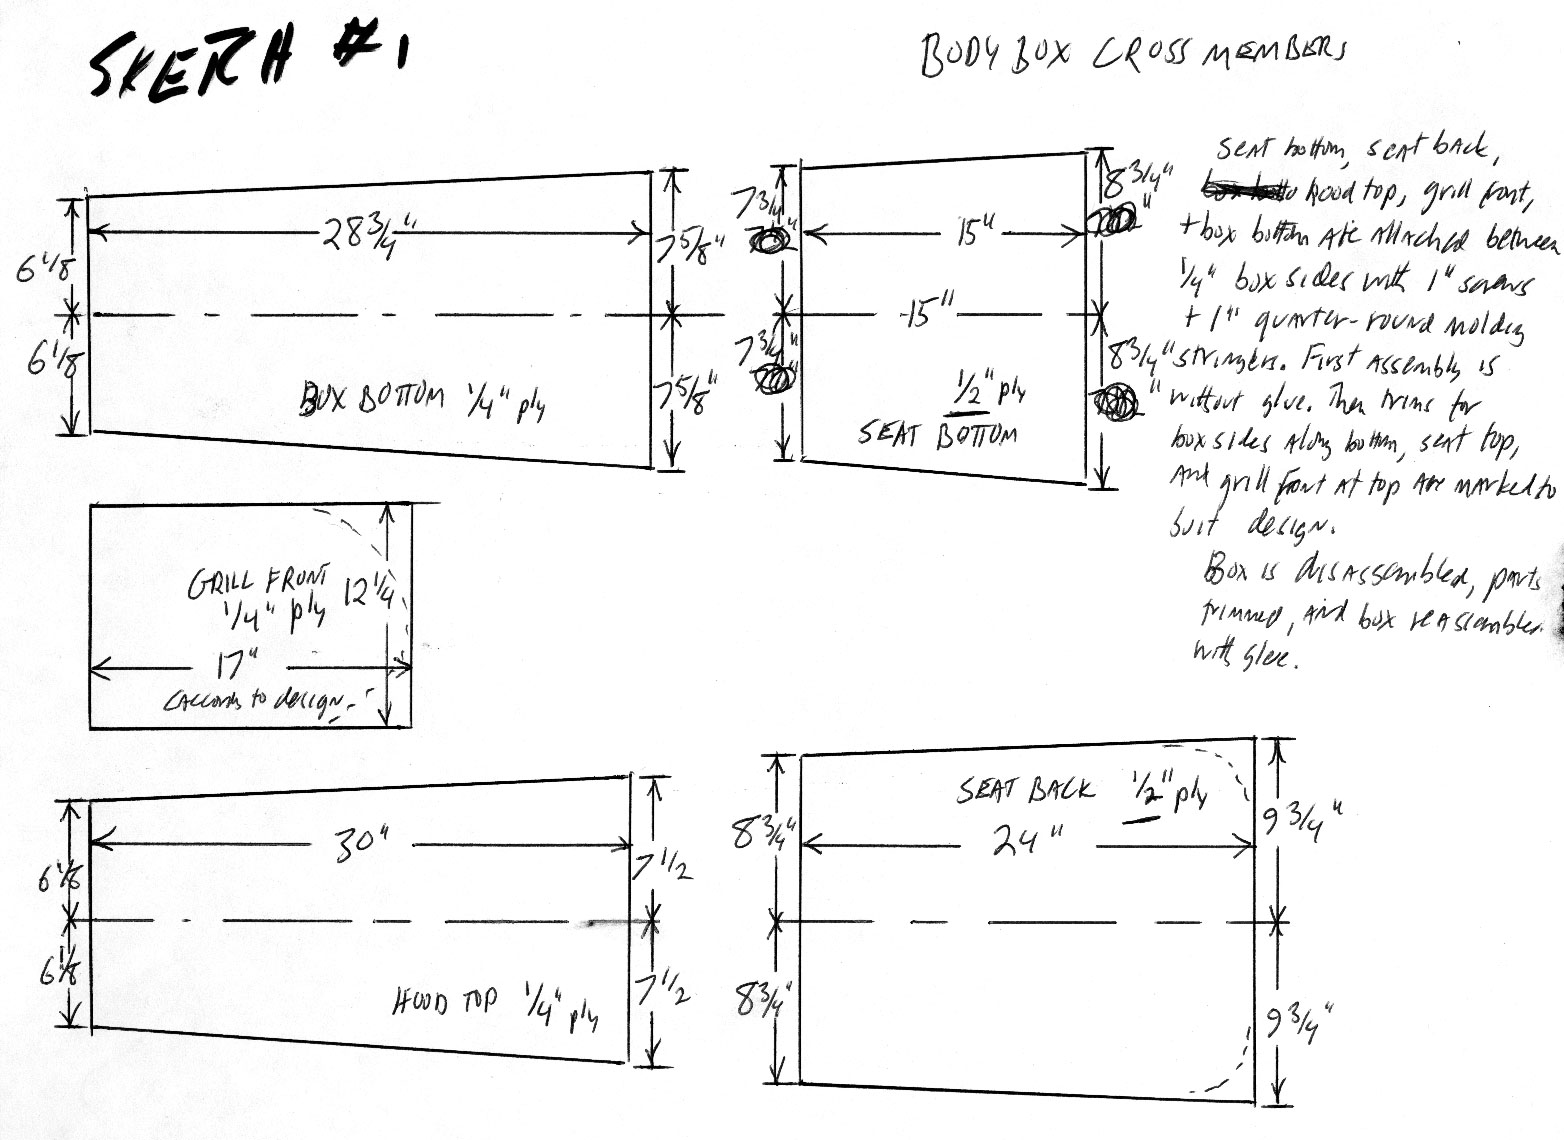
The cabin area in its most basic form consists of a plywood box that is mounted between the rails. The lowermost part of the box sits below the chassis to help lower the centre of gravity and provide the correct visual aesthetic. Generally the bottom of the cabin is approximately 100mm from the road surface.
If you are planning to use your Cyclekart on unsealed roads or paddocks, the 100mm clearance is a good rule to stick to. This is a requirement in New Zealand where they employ the 'fence post' test to make sure that the Cyclekart can drive over a fence post.
The straight chassis is the easiest to build and most suitable for the novice. It is advisable to weld the chassis and is a good project on which to cut your teeth if you have never welded before. Your typical store bought MIG welder with 0.9 wire will work well with the 1.6mm RHS. Make sure to square up the chassis before tacking it together by measuring from corner to corner and comparing the dimensions.
Drop Chassis Design
(Difficulty 3/5)

Drop Chassis
A drop chassis is similar in construction to the straight chassis but has a dropped section to lower the main cabin are relative to the axles. The drop sections can be at the rear, or both front and rear and are often made to follow the design of the tribute car.
The dropped sections are achieved by cutting mitred joins in the chassis side rails and then welding the sections together.
Generally the rear axle is positioned below the chassis in this type of design
This style of chassis is a little more complicated to build than the straight style chassis and so may not be suitable for a novice, but should be relatively straightforward for the average handyman.
Profiled Chassis Design
(Difficulty 4/5)
Profiled Chassis
A profiled chassis design generally consists of profile cut side members that then have the top and bottom flanges welded in place to form custom side rails. These often follow the exact design of the tribute car and can be easily made to follow complex shapes in both profile and plan.
Profiled chassis are generally profile cut on plasma or laser cutters which requires CAD designed plans to be made, but they can also be hand cut by scaling up and laying out the plans on a 1:1 scale, but this can be a lot of work. Definitely not advisable for a novice builder.
A Note on Construction Methods
Typically the chassis along with steering and other components are welded together. This provides a great amount of strength and is the easiest method of construction. However welding may be a skill that is not part of the arsenal of the novice cyclekart builder. Our recommendation is to buy / borrow or hire a MIG welder and learn to weld. It is not a difficult thing to do and once the welder is set up, and with a little practice it is easy to provide consistent welds. The main trick here is simply practice. Buy some extra steel, cut it up into smaller sections and simply practice the same type of welded joins that you will use on the cyclekart. It will not take too long to get an acceptable result.
MIG welders are the generally accepted norm for this kind of work and are available in both gas and gas-less versions. The gas versions produce a much better quality weld, but maybe more expensive to operate as they require the hire of the gas bottle. You can hire gas bottles from Bunnings and several major tool shop chains. You will need to pay a refundable deposit on the bottle which will you will get back when the bottle is returned. Typical cost for a bottle of gas is $90, which is money well spent.
Gasless versions use a flux cored wire which generally creates a lot more splatter. This can make an already difficult task that little bit more difficult, especially for the novice. It is possible to use gas-less wire in a MIG designed for use with welding gas, but the opposite may not be true. Modern inverter based welders are cheap, light and higher end models often come with computerised setup making it easy to dial in the settings for your particular metal and wire thickness. For thin gauge metals like car body panel and the 1.6mm chassis a 0.9mm welding wire is optimal as this takes less heat to create the weld pool which will make it much easier when first starting out. Thicker wire requires more heat which will easily burn through thinner materials, especially when welding near to the edge of a panel.
There have also been Cyclekart chassis bolted together using brackets, riveted together like some original chassis or even constructed from wood, all of which are viable methods of construction, but in all of these cases it is worth considering the forces that are in play when the Cyclekart is being driven hard.
Bolted, screwed and riveted joints all act as potential movable joints and pivot points so the chassis design itself needs to be suitable for the method of construction employed. This means that some form of additional strengthening may be required, such as triangulation of the chassis members using rods or additional chassis members, the addition of fillet plates in corners to prevent movement of the chassis under load, or any comination thereof.
Generally speaking a welded chassis is far superior to other construction methods and so it is worth taking the time to learn to weld. The other option is to cut and mark everything out and get it welded by someone else.
Welding safety
Of course it goes without saying that you need to wear the appropriate PPE such as a welding mask and gloves. But something that might get overlooked by the amateur welding enthusiast is the welding of galvanised metal.
Galvanised metal (zincalume / galvanised / hot dipped / electroplated / etc) has a thin zinc coating that helps prevent corrosion. Much of the steel that you will find to make chassis members will have some form of zinc coating on it. It is important to remove this coating from the area that is to be welded before you weld, or you may be at risk of 'metal fume fever'. A simple flap wheel or grinder is all that it needed to remove the zinc coating from the weld area.
What happens when you weld is that the zinc coating vaporises and forms zinc oxide which when breathed in can cause inflammation, headaches and dizziness. This affects some people more than others and whilst it will not likely cause permanent issues, given the limited amount of welding required on one chassis, is well worth avoiding, especially if you already suffer from respiratory issues.